Tuesday, March 4, 2014

DoTerra Oils

I don't know about you but I use a lot of oils for my children - cuts/scrapes, bumps and bruises, fevers, sleeping and soothing, immune boosting... and boy do my kids LOVE them! My 1-year-old gets super excited and starts dancing around when he sees me pull them out. I have seen him try to put some on his feet (lid closed of course, but it was cute) and my 2-yr-old always asks to go to the "oil store". After I put some on her she takes a deep breath (no matter where I put it on her) and says "smells good." These are staples in our home.

Here is a really good list to help you know what to do for your sweet little ones.
Allergies: Lemon, Lavender and Peppermint, 1 drop each. Apply to bottom of feet morning and night.

Asthma: Breathe and Eucalyptus, 2-3 drops each {dilute with coconut oil}. Apply to back, chest, throat and bottom of feet. Recommended to cover feet with socks.

Bed Wetting: Balance, massage 2-4 drops on feet at bedtime. Cypress, massage 2-4 drops on bladder area before sleep.

Bee Sting: Melaleuca and Lavender, 1-2 drops {dilute with coconut oil}. Apply on location.

Bladder Infection, UTI: OnGuard, massage 2 drops on lower abdomen. Also, OnGuard and Oregano, 1 drop each (dilute with coconut oil). Massage on bottom of each feet.

Boils: Frankincense and Helichrysm, 1 drop (dilute with coconut oil). Apply directly on boil.

Bronchitis: Breathe, Eucalyptus, Frankincense,Lavender or Peppermint. Select 1 or 2 of these oils (dilute with coconut oil). Massage 1-2 drops on chest area.

Burns: Lavender and Melaleuca, 2-3 drops diluted in coconut oil. For severe burns add Helichrysum.

Canker Sore: Melaleuca, 1 drop, just enough to cover and dab on sore.

Chicken Pox: Melaleuca and Lavender, 3 drops each, added to 1 oz. of Calamine lotion. Apply to itchy spots. Baking Soda/Lavender bath for relief: 1 cup Baking Soda with 2-4 drops of Lavender in warm bathwater. OnGuard, diffuse in air to protect against spreading contagion.

Colds: At first sign of cold, Breathe, 1-2 drops. Apply to back of neck. OnGuard, 1 drop. Apply to bottom of feet. Repeat frequently. For infants: dilute 1-2 drops of Thyme or Lemon oil in 2 Tbs. fractionated coconut oil and massage a little on neck and chest.

Colic: DigestZen, 5 drops diluted with 1 teaspoon of coconut oil. Massage on stomach and apply warm compress. Also, Lavender and Peppermint (dilute in coconut oil). Apply to bottom of feet.

Cough: Breathe or Peppermint added to Frankincense, 1-2 drops each (dilute with coconut oil). For children: apply to chest and back. After it is absorbed, re-apply several times per day and night until cough stops. For infants:apply same blend to feet. Make sure to cover area so the baby does not touch it and then touch eyes.

Constipation: DigestZen, 2 drops (dilute with coconut oil). Massage on stomach.

Cradle Cap: Lavender or Melaleuca or Geranium, mix 1 drop with a small amount of coconut oil. Apply to affected area. Let the oils be absorbed before washing the head. Usually 3 to 4 applications needed to eliminate rash. Be careful not to get oils in baby's eyes.

Croup: Breathe and/or Eucalyptus, 1-2 drops applied to bottom of feet. Dilute with coconut oil for chest and back. Continue using the oils, even after the child is better, for at least for 4 days.

Crying: Serenity, Ylang Ylang, Lavender or Roman Chamomile, 2 drops (dilute with coconut oil). Apply to bottom of feet for comfort.

Cuts and Scrapes: Melaleuca and Lavender, 1-2 drops (dilute with coconut oil).


Diarrhea: DigestZen, 2 drops (dilute with coconut oil). Massage on lower stomach.

Digestion: DigestZen, 2 drops (dilute with coconut oil). Massage on stomach.  

Earache: Add Melaleuca and Grapefruit to Ear Infection protocol (below). 
Ear Infection: Lavender, Frankincense and Basil, apply 2 drops each to cotton ball. Rub around the ear and down the neck, then place the cotton ball in the ear. 
Eczema: Lavender and Melaleuca, 2 drops each (dilute with coconut oil). Apply topically to rash. 
Fever: Peppermint, 1 drop (dilute with coconut oil). Apply to forehead, back of neck and bottom of feet every 15-30 minutes, until fever goes down. Be careful that child does not touch the areas of applied oils and rub the eyes. 
Fever Blister/Cold Sore (Herpes Simplex): Lavender and Melaleuca, or Lavender and Frankincense, 1-2 drops each in 50/50 dilution with coconut oil. Apply directly to blister. Apply frequently and continue for 3 days after symptoms have passed. 
Gum and Tooth Pain: Clove oil (dilute with coconut oil). Put on a cotton swab; pinpoint painful area and apply. (Clove oil is very strong.) 
Impetigo: OnGuard, 2-3 drops (dilute with coconut oil). Apply topically to the affected area 3 or 4 times per day until infection clears up. Impetigo is very contagious. Wash hands with OnGuard, 20 drops mixed with 8 oz. water in spray bottle. 
Insect Bite: Lavender and Melaleuca or Purify, 1-2 drops each (dilute with coconut oil). 
Insect Repellant: TerraShield applied topically to exposed areas. 
Itchy Skin: Peppermint, 1-2 drops (dilute with coconut oil). Apply topically to area. . 
Lice: Melaleuca and Lemon, 2-5 drops each. For this application, use Ys dilution. (1 drop of essential oil to 5 drops of coconut oil). Apply to scalp and let stand at least 1/2 hour. Shampoo with 2-5 drops of Melaleuca in 1 tsp. of shampoo. Continue with this Melaleuca shampoo for 1 week. 
Measles: Lavender and Melaleuca, 10 drops each mixed with 40 drops of coconut oil. Use topically to soothe measles rash.

Motion Sickness: DigestZen, 1-2 drops (dilute with coconut oil). Apply to bottom of feet.

Pink Eye: For older children and adults (who can resist touching the location): Melaleuca and Purify, 2 or 3 drops each, applied around socket of the eye. Place drops in palm of hand and apply to eye with finger tip. For younger children: Melaleuca and Purify, 2 drops each, applied to V3 of a cotton pad. Using a hard shell eye patch (available at the pharmacy), place the cotton pad in the eye patch, with the oils side of the cotton to the outside, away from the eyes, so there is no direct contact with the eye or eyelid. Place the eye patch over the affected eye. Repeat the above procedures 2 to 4 times during the day. At the same time, Eucalyptus, 1-2 drops (diluted with coconut oil). Rub on feet and toes. Repeat the eye treatment at night and rotate from Eucalyptus to Oregano, 1-2 drops (diluted with coconut oil) for the feet. Repeat the daily protocol until redness disappears and two days following. Caution the child not to rub or scratch the eye. Place socks on the feet so that oils are not transferred from the feet to other areas.

Pneumonia: Breathe (amount according to diffuser instructions) in a diffuser and/or steam tent. Frankincense, Lavender and Melaleuca, and/or OnGuard, 1-2 drops (dilute with coconut oil). Apply to the bottom of feet and spine. 
Poison Ivy: Melaleuca and Lavender, 4 drops each (dilute with coconut oil).

Ringworm: Lavender, Melaleuca and Thyme, blend of 30 drops each for a 10 day supply. Apply topically on the area of infection 3 times a day for 10 days. Follow this with Melaleuca (may be mixed 3:1 with coconut oil) for 30 days to assure that the fungus does not return. Cleanse with Melaleuca or OnGuard after treatment, so the fungus does not spread. 
Scabies: Melaleuca or Purify, 1-2 drops (dilute slightly with coconut oil). Apply topically to the affected area. Spray application is recommended. Skin clears typically in a few days. For problem areas that do not heal readily, add Oregano, 1-2 drops to the oil spray. 
Sinus Infection: Breathe, diffused into air overnight, or when child is in confined space. Breathe and Eucalyptus, 2-3 drops each applied on feet, and (dilute with coconut oil) for application on chest. 
Sleeplessness: Lavender or Serenity, 1-2 drops, (dilute with coconut oil). Apply to bottom of feet. 
Sunburn: Lavender (soothing, healing) and Peppermint (cooling), 20 drops each to a 2 oz. spray bottle. Fill the remainder with either water or fractionated coconut oil. Shake and apply as soon as possible to the sunburned area. Repeat every 2 hours, 4 to 6 times. Continue with a blend of Lavender and Frankincense, 20 drops each and of 1 oz. fractionated coconut oil. Spray or apply directly 2 to 4 times daily. If there is any blistering, add Melaleuca, 20 drops, to the blend to prevent any infection from open sores.

Sunscreen: Helichrysum and Lavender, 60 drops each, into a 2 oz. spray bottle. Fill the remainder with fractionated coconut oil. Spray on and use as any store purchased sunscreen. 
Strep or Sore Throat: Oregano, 1 drop, Melaleuca or OnGuard, 2 drops (dilute with coconut oil). Apply topically on throat, around ears, and on feet. At least 3 to 4 times daily for 2-3 days. 
Teeth Grinding: Lavender or Serenity, 2 drops of either. Massage on bottom of feet. 
Temper Tantrum: Balance and Lavender or Serenity, 1-2 drops (diluted with coconut oil). Apply to bottom of feet. 
Tonsilitis: OnGuard, 3-4 drops (dilute with coconut oil). Gently massage blend over throat and up to the jaw line.Also OnGuard, diffuse in air overnight. For older children: Oregano, 2-3 drops, to a mouthful of water, gargle for as long as possible, then swallow. (Oregano is a "hot" oil, so be careful not to spit out or touch the lips with oil). Repeat every 1-2 hours. For mid age children: OnGuard instead of Oregano in the protocol above. For younger children: Oregano or OnGuard,
2-3 drops, added to a' spoonful of applesauce and swallow. Repeat every 1-2 hours. For youngest children: OnGuard, 1-2 drops, dilute with a carrier oil and apply topically to the throat area every 1-2 hours. 
Whooping Cough: Breathe, 2-3 drops (dilute with coconut oil). Apply to chest. Eucalyptus and OnGuard, 1-2 drops (dilute with coconut oil). Apply to bottom of feet.

Sunday, December 29, 2013

Hot summer day fun with the blob!


The home made water slide/blob. This was an amazing amount of fun. Kept my kids and the neighborhood kids busy and cool for hours. It took some time to make but well worth it! You only need duct tape and plastic sheeting ( the kind you use while you are painting).

Start by Folding the plastic sheeting in half and tape the three open sides with duct tape (it helps to have assistance) but leave open a small hole for the water hose. I put duct tape on every seem. I made mine 10x20 so I had a line of duct tape in the very center.
Put the water hose in it and let it fill. When it’s totally full, tape the small opening shut and let the kids loose.
I laid on this my kids ran, jumped, rolled, wrestled and it help up great. Make sure when you begin to add water that is where you want it to stay, there is no moving it with water. So find the flattest spot possible.


DIY: Tricycle Car Wash

This may be one of the best things you could build for your kids.

DIY: Tricycle Car Wash

DIY: Tricycle Carwash. Follow these easy plans and have the best summer ever!  |  Design Mom
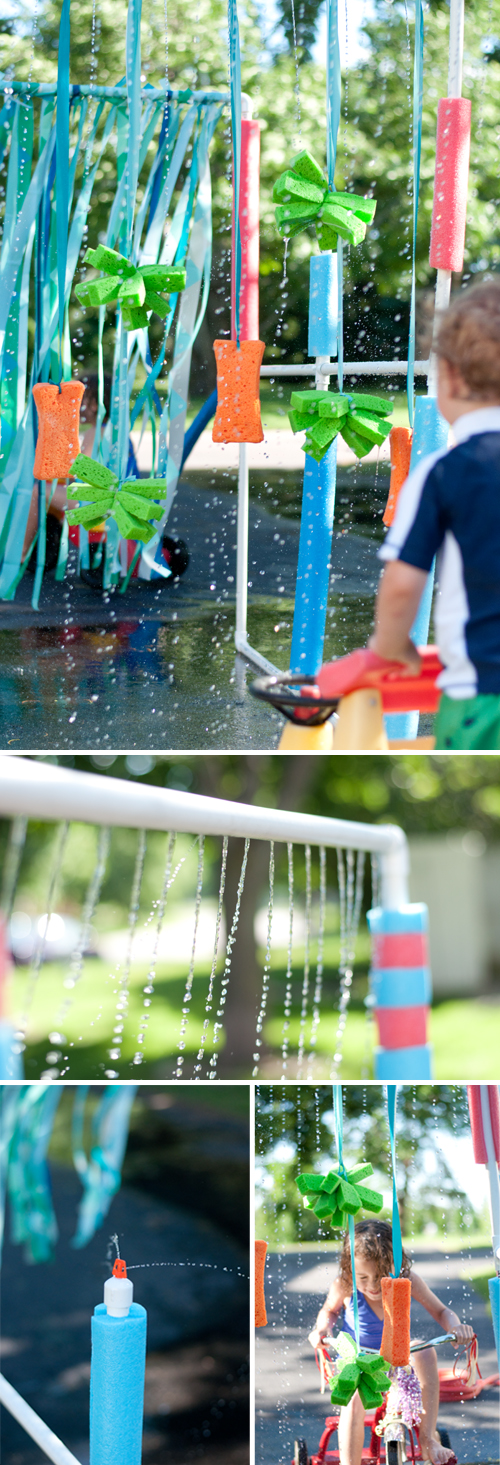
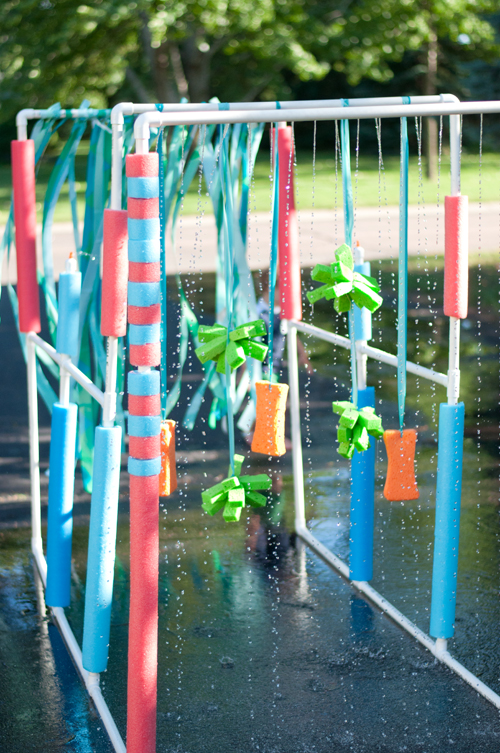
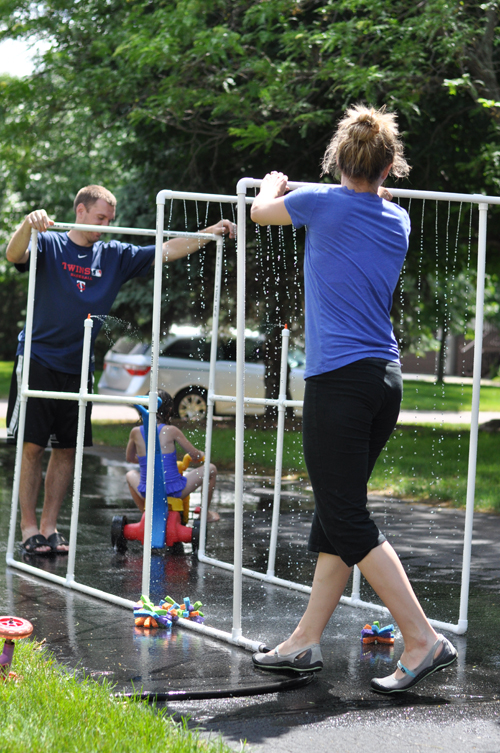
Holy fun times!! Water play is one of the best ways to beat the summer’s heat and I think we can all agree that this image is every child’s water heaven dream. I can attest that even as an adult, I am pretty giddy about it myself. So I thought it would be fun to build one for my own kids, and I took notes and drew up plans, so that you can build one too! Everything you need to know is right here in this post.
DIY: The BEST Tricycle Carwash. Follow these easy plans and have the coolest summer ever!  |  Design Mom
I had never used PVC pipe to build anything before so I was a little nervous, but once you come to grips with the PVC aisle (so. many. options!), it is very easy to work with. I mulled over a number of plans and directions before setting on the layout of this one and then adapted it to my liking.
DIY: The BEST Tricycle Carwash. Follow these easy plans and have the coolest summer ever!  |  Design MomDIY: The BEST Tricycle Carwash. Follow these easy plans and have the coolest summer ever!  |  Design Mom
With a trip to the hardware store and Target, this tricycle car wash came together quickly and easily.
DIY: The COOLEST Tricycle Carwash. Follow these easy plans and have the best summer ever!  |  Design Mom
I promise, this is easier than you think! Let’s get started.
DIY: The COOLEST Tricycle Carwash. Follow these easy plans and have the best summer ever!  |  Design Mom
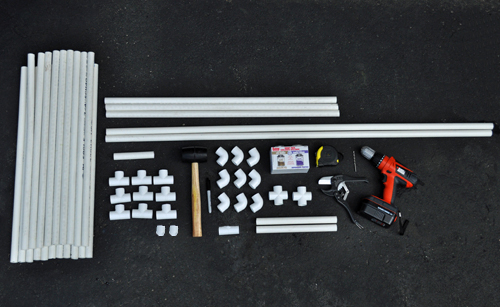
Supplies:
-1 – 6 inch piece of PVC
-2 – 1 foot lengths of PVC
-2 – 5 foot lengths of PVC
-3 – 3 foot lengths of PVC
-20 – 2.5 foot lengths of PVC
-2 – cross PVC connectors
-2 – PVC caps
-9 – ‘T’ PVC connectors
-9 – elbow PVC connectors
-1 – female hose adapter to PVC connector piece (try to get one with a spinning attachment)
-2 misters (found mine at Lowe’s in the PVC pipe section)
-rubber mallet
-PVC pipe cutter
-tape measure
-drill with 1/8 inch drill bit
-marker
-PVC adhesive (optional)
DIY: The COOLEST Tricycle Carwash. Follow these easy plans and have the best summer ever!  |  Design Mom
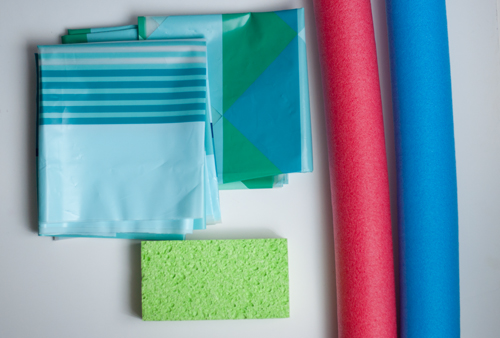
-sponges (we used the giant ones found in Target stores)
-pool noodles (in store)
-plastic shower curtains — we used this one and this one
-scissors/rolling blade
-printable construction plan (free!)
Note: all the PVC pipe and connectors used for this project were 3/4 inch.
DIY: The COOLEST Tricycle Carwash. Follow these easy plans and have the best summer ever!  |  Design Mom
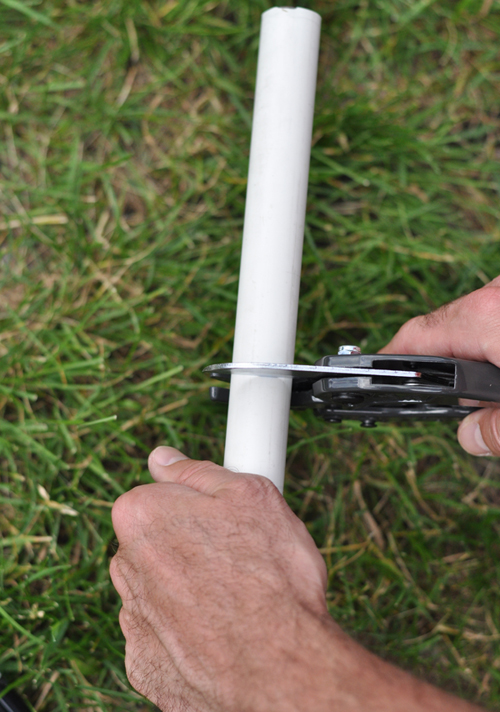
First things first, prep all the PVC pipe to the lengths listed above. Sometimes the store will cut it for free so if you are concerned about measuring or using sharp tools, try that route. We used the PVC pipe cutter I linked to above and were very happy with the ease of use and the results.
DIY: The COOLEST Tricycle Carwash. Follow these easy plans and have the best summer ever!  |  Design Mom
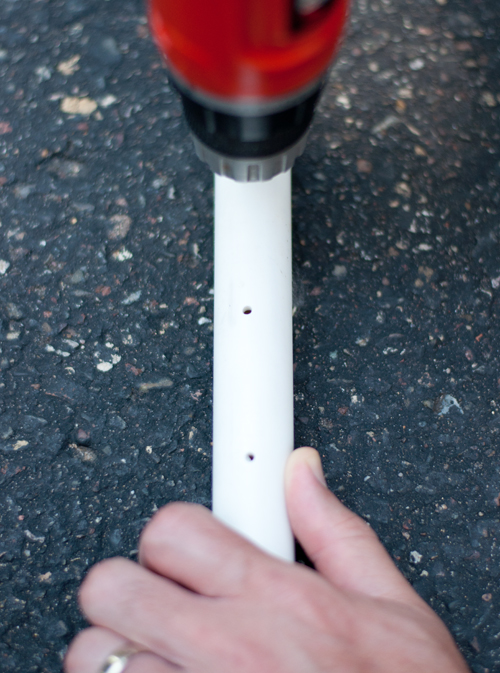
Holes for the water to spray out of will be drilled into two of the 3-foot lengths. We chose to put more holes (like 18)  in one as it was slated for the first crossbar and guaranteed really wet kiddos. For the second bar, we only made 7 holes because of the hanging sponges. But you can adapt the plan as you like.
Remember, the more holes there are, the less water pressure for parts like the misters. However, more holes means more water which is super fun! Note: We didn’t do any holes in the third cross bar but you could add them there too if you want!
DIY: The COOLEST Tricycle Carwash. Follow these easy plans and have the best summer ever!  |  Design Mom
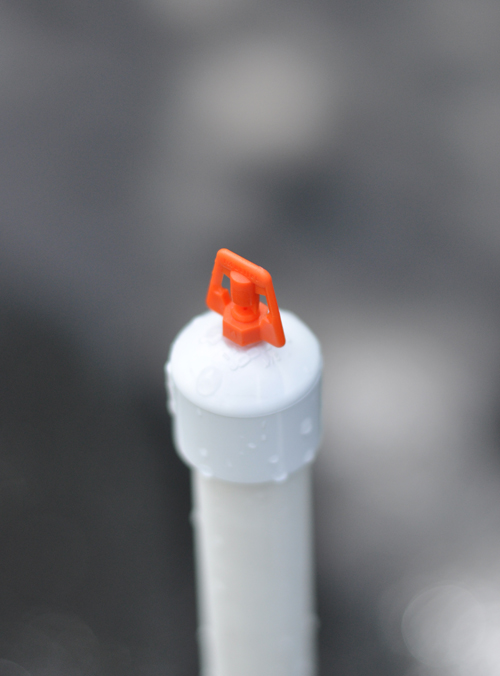
Use the drill to make a hole in each of the two PVC caps for the misters to stick in.
DIY: The COOLEST Tricycle Carwash. Follow these easy plans and have the best summer ever!  |  Design Mom
Once everything is ready, assemble it according to the printable directions. The 3-foot sections are the crossbars, the 5-footers are the first perpendicular poles of the car wash. There should only be one official opening (not counting drilled holes) and that is where the hose adapter/PVC connector is. Use the rubber mallet to securely connect the pieces.
We chose not to use PVC pipe adhesive. We don’t have a lot of space for storage and sadly, it’s not always tricycle car wash weather where we live, so for us, being able to dis-assemble this was important. But we haven’t had a problem with leaks. Before we start the water each time, we make sure all the joints and connections are solid and the pipes have stayed together.
If you go the adhesive route, use it according to the manufacturer’s directions. Note: Another advantage of not using adhesive is that joints can be separated when it comes time to drain the structure. It holds A LOT of water and it’s difficult to wrestle it around to get the water to drain otherwise.
DIY: The COOLEST Tricycle Carwash. Follow these easy plans and have the best summer ever!  |  Design Mom
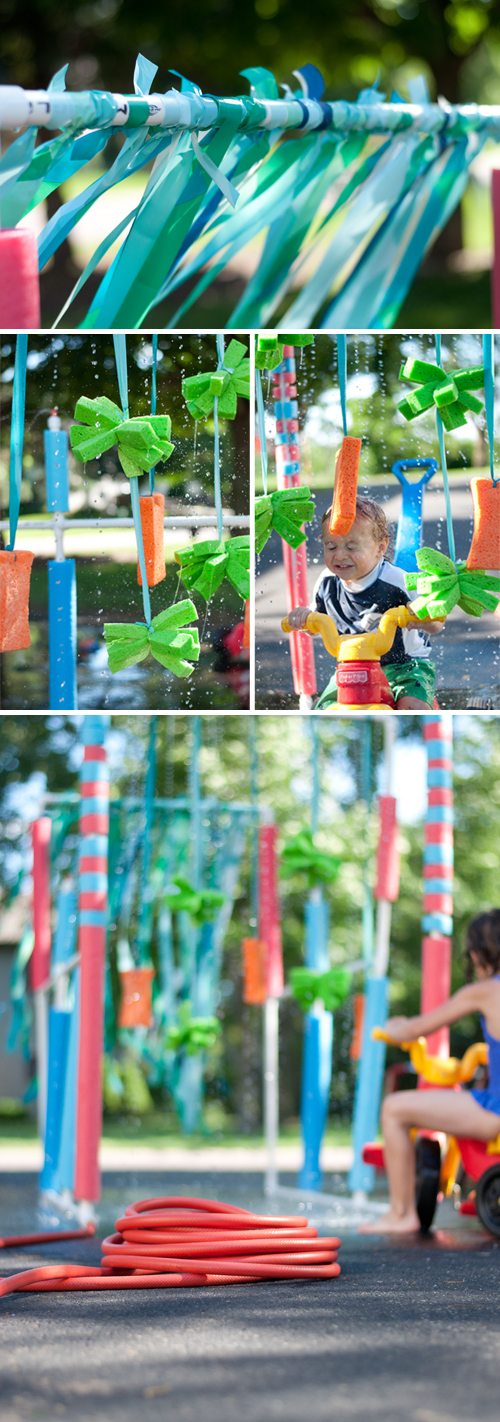
After the frame is assembled, it’s time to add some color. I used plastic shower curtains and cut them into 1, 1.5 and 2 inch strips. I tied the strips on the final crossbar to act as the car wash finale and add a little drama for the tricycle drivers. Note: I did try a lightweight plastic table cloth first, but the weight of the shower curtain was better.
DIY: The COOLEST Tricycle Carwash. Follow these easy plans and have the best summer ever!  |  Design Mom
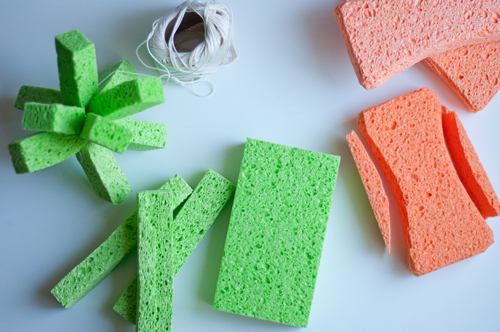
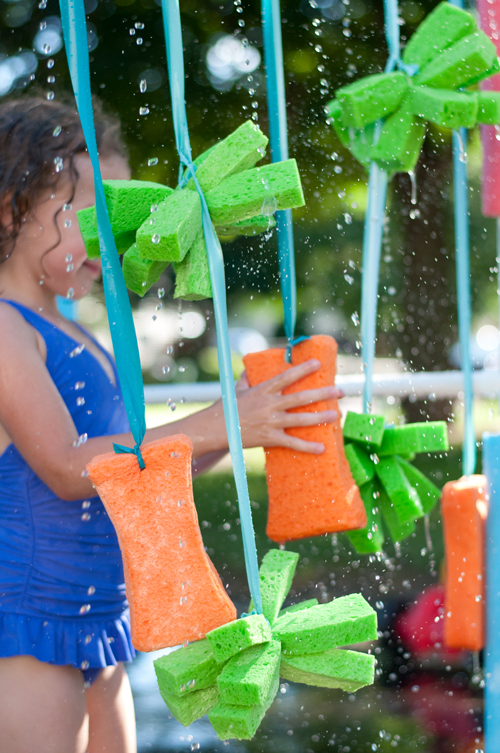
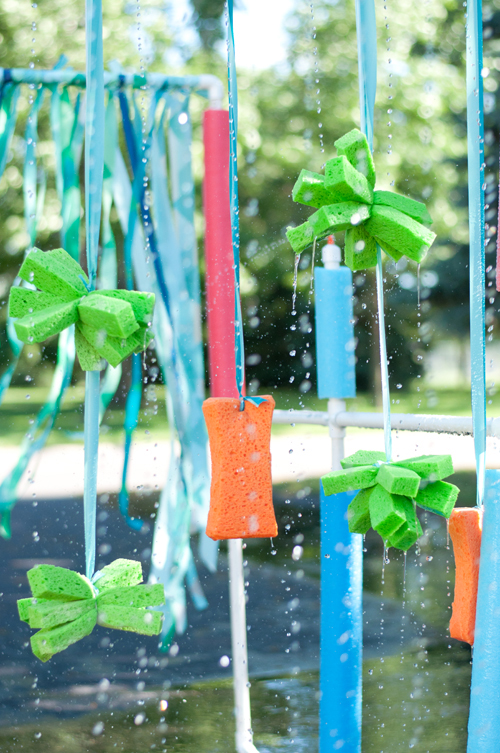
I took ordinary over-sized sponges from Target and cut down the orange ones similar to the sponges in the inspiration pin and cut down the green ones to make sponge balls.
DIY: The COOLEST Tricycle Carwash. Follow these easy plans and have the best summer ever!  |  Design Mom
I used a few of the extra shower curtain strips to string the sponges up at varying heights, at the exact level for ultimate interaction with tricycle riders.
DIY: The COOLEST Tricycle Carwash. Follow these easy plans and have the best summer ever!  |  Design Mom
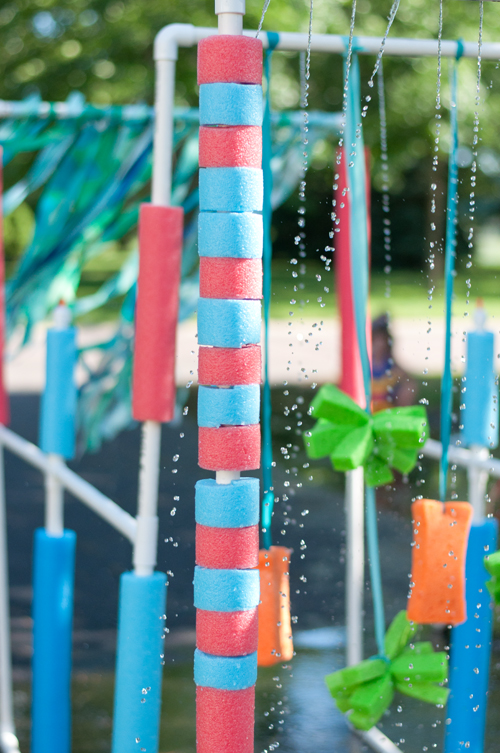
To give the PVC a little color and padding, I used foam pool noodles. I chose the ones with a hole in the center, and cut a line down one side of it. Then I was able to open it up and wrap it around the poles.
DIY: The COOLEST Tricycle Carwash. Follow these easy plans and have the best summer ever!  |  Design Mom
I cannot say enough how much fun our tricycle car wash is! Each time we turn it on, it seems to attract little neighbor friends. It’s kind of an instant water party!
P.S. — Don’t forget to download the free and helpful construction plan!
Tricycle Car Wash Plan - Design Mom

Tricks when traveling

I love to visit new places. Some of these new places are unexpected. Here are a collection of tips I've been using to make life a little easier. More will be added as tips come to me.


Instead of packing a whole bottle of shower gel, shampoo, mouthwash,toothpaste ect, I've bought travel size or trial size. With my shampoo and body wash many stores don't have my favorite kind in trial size. So I just buy a small squeezable container in the travel size department (at Walmart).


Limit your toiletries to 1 Quart Ziplock with no bigger than 3.4 oz. bottles as per airline regulations and keep it easy access to take out at the security gate.

Always carry a travel size pack of baby wipes. You never know just how you will need them, but you will.

 Pack your dirty shoes in a shower cap.

Pack your dirty shoes in a shower cap.

Rolled clothing takes up less space than folded clothing.

13 Travel Tips That Will Make You Feel Smart


 Contact containers are great for storing cosmetics.

aubree lennon / buzzfeed
 

Perfect for touch-ups!


Stash extra cash in an empty lip balm. This is nice even when not traveling. No one will ever think to look there for money.

Stash extra cash in an empty lip balm.


Use a button to keep your earrings together.

Use a button to keep your earrings together. 

Or you can use a weekly medicine container to store your jewelry. 


I always pack a compact travel umbrella. You can never trust Mother Nature.

Of course, you will take your electronics. You can store cords, head phones and cables in an eye glass case.


The many uses of salt

Salt is a great seasoning to use, and it is used as a natural preservative because it prohibits the growth of mold, bacteria and yeast, but did you know that salt has more than 14,000 uses? Because salt is non-toxic, you can use it in a myriad of ways all around your house.

1. Sprinkle salt on spills and it will absorb the liquid from coffee, tea or wine spills, making it easier to remove the stains.


2. Mix a little salt with vinegar to clean your hands after you’ve handled raw onions to remove the odor of the onions. This solution will also remove food stains from your hands, such as beet juice or food colorings.


3. 
Use salt to clean your cast iron pans. Simply sprinkle some in your pan and rub it with a dry cloth.


4. Remove stains (and deodorize) your cutting boards by rubbing them with salt and a little lemon juice.


5. Form a paste with salt and vinegar and use it to polish brass, copper and silver. After rubbing on the paste, rinse and dry the objects; they’ll look shiny and new again.


6. Add several tablespoons of salt to a gallon of warm water and clean the windows in your house and car with it. The solution loosens grime and will even keep ice from forming on your windows when the temperature drops below freezing.


7. Clean and refresh your silk flowers by putting several cups of salt and your flowers in a paper grocery bag and shaking them for several minutes.


8. Put 1 tablespoon of salt and 1 tablespoon of vinegar in your stained tea and coffee cups. Let the liquid stand in the cups for a few hours, then wash and rinse—the coffee and tea stains will be gone.


Salt in beauty & Health
Salt can be used as an effective home remedy to alleviate health conditions.

1. Add salt to olive oil or any carrier oil, such as lavender, to form a bath scrub. Rub it all over your body before you shower. The salt removes dead skin cells and rejuvenates your skin.


2. Put a cup of salt in your bath water and soak for a half hour. The salt helps draw toxins out of the pores of your skin. If you have Epsom salt, that works the best.


3. Freshen your hair by dissolving some salt and warm water in a spray bottle. Spritz it lightly on your hair to give it some shine and volume.


4. Dissolve salt in warm water and swish it in your mouth for a few minutes. It makes a great mouth wash. Warm salt water will also ease toothaches and mouth sores.


5. Gargle with warm salt water to ease a sore throat. Let 1 teaspoon of salt dissolve in a glass of warm water before you gargle.


6. Combine salt with a little bit of baking soda and water and use it as a toothpaste.


7. Moisten insect stings with some water and apply salt to the sting. This trick not only takes the sting out, it will stop mosquito bites from itching.


8. Give your face a lift by mixing 1 tablespoon of salt into 1 tablespoon of olive oil and massaging it into your face and neck. After your massage, wash and rinse your face. The mixture of salt and oil makes a great toner for your skin.


9. Control dandruff by sprinkling and massaging 1 tablespoon of salt into your dry hair. Let it stay in your hair for 5 minutes, then shampoo and rinse your hair.


Salt in the Kitchen & Laundry

Here are some other ways to use salt in your kitchen—and in your laundry room.
  1. 1
    Soak fish in salt water for five minutes and the fish will be much easier to scale.

  2. 2
    Add a dash of salt to your coffee grounds before you begin to brew; your coffee will taste better if you are using inferior coffee beans since the salt cuts the bitterness.

  3. 3
    Dip apples, pears or other non-acidic fruits in lightly salted water and the fruit will not turn brown.

  4. 4
    Layer salt and ice in an ice bucket to chill your Champagne or wine quickly.

  5. 5
    Smother a small grease fire by tossing a handful of salt on it. If a spill on the bottom of your oven starts to smoke, toss some salt on it and it will stop the smoke, too.

  6. 6
    Sprinkle a line of salt on your counter top to stop ants. The ants will not cross over a line of salt.

  7. 7
    Add a few tablespoons of salt to the final rinse of your laundry. Your clothes will not freeze on the clothesline during cold weather.

  8. 8
    Add 1 cup of course salt to your wash to soften new blue jeans and to stop colors from fading.

  9. 9
    Dissolve excess soap suds by sprinkling some salt on them.

Other Great Uses for Salt

Try some of these salt solutions for common, everyday problems.


  1. 1
    Toss salt on icy walkways to melt the ice.
  2. 2
    Add 1 part salt to 3 parts of boiling water and pour it on the weeds in your garden. This is a great non-toxic solution for killing weeds. You can also sprinkle dry salt into any crack or crevice where you don’t want grass to grow; the salt will kill the grass.

  3. 3
    Sprinkle salt in your carpets and let it sit overnight. Vacuum the carpet the following day and your carpets will be fresher and the salt odor will help to repel fleas. Rinsing your pet’s bedding in salt water will also help control fleas.

  4. 4
    Make a line of salt along the perimeter of your garden to control slugs. The salt draws moisture from the slugs, which kills them.


    Tips
  • Add 1 cup salt to 2 cups washing detergent when dyeing jeans; it helps color blend well.
  • For repelling ants, sprinkle a bit of salt around your house foundation. It repels ants and keeps ants out.
  • For sore muscles or fresh new bad bruise, rub moistened Epsom salts on the sore place and if possible keep a poultice of damp Epsom salts on the area for about 1 hour. The muscle will feel much better and what would have been a bad bruise will fade quickly and be far less painful. If you have bursitis you can also use this method.
  • When it comes right down to it, salt is salt. It all comes from the ocean, so there is no need to pay for gourmet salt for household uses.
  • Keep several boxes of regular table salt and several boxes of course salt on hand. Store some of your salt in the laundry room and in your garden shed so it is handy when you need it.